| Seekzed Knowledge Services
"Soft Knowledge, Fast Knowledge"
|
|---|
HOW TO UNINSTALL DRIVES:Installing drivers in a computer is very helpful, as these codes act as a middleman between the personal computer's hardware and the operating system. Installing any driver is quite easy, but if there is some problem in the computer due to these drivers, then it is very important to uninstall them. These drives get installed like any normal software, but they integrate deeply in the operating system. Other software doesn't affect the operating system so much. Mostly installing drivers is a simple process, which is seamless and transparent to us. If we install a wrong driver, things can go really wrong and the computer can even crash. One such example is of Microsoft Windows Vista. It came into the market in the year 2007. It had few problems like it was very slow and was prone to crashing. After investigations done by Microsoft, it was found that many of the crashes were due to the driver issues. Microsoft than introduced a way to roll back to the previous version of the driver. Also they introduced a method to remove or uninstall the driver from the system. This facility gave a clean slate to try again and install a different version. For uninstalling a driver, we should use the safest and best method, which is device's uninstaller program. If we install any device to the system through an installer, there is an option to uninstall it. We need to follow the below mentioned steps. 1. Go to start button and write Uninstall Program. Press enter after typing. 2. A new window will open which will have a list of devices and drivers. Go through the list and select the deriver which needs to be uninstalled. Double click on the driver, so that the un-installation process can start. In some computers, there is no option for un-installer. In this case we need to use the Device Manager to remove the driver completely. 1. Click on Start button and type Device Manager. Press enter. 2. Double click on the category of device whose driver needs to be uninstalled. (Example: Graphics card will be present in the Display Adaptors list). 3. Right click on the device, and select Uninstall. 4. Windows will now show a new screen to confirm the removal of the device. Click on OK button, so that the driver is removed. 5. Once the un-installation is finished, reboot the computer. 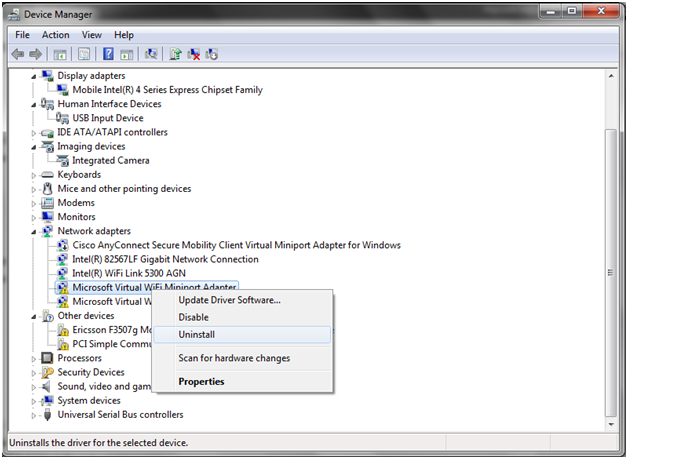
Once we uninstall the problematic driver, we can download and install a new version from the manufacturer's website. There is another method, which is called Roll back to a previous driver. Through this method, we remove the problematic driver and roll back to the previous one. We need to follow the below mentioned steps to roll back to the previous driver. 1. Click on Start button and type Device Manager. Then press Enter. 2. Double click on the category of device which is problematic (for example, the graphics card will be in the Display Adapters). 3. Double-click on this device so that the new window is opened. This window is the Properties window. 4. Go to the Driver tab. 5. Press the Roll Back Driver button. 6. A pop up will appear, for confirming the decision of roll back. Click the Yes button so that the process of rolling back is started. 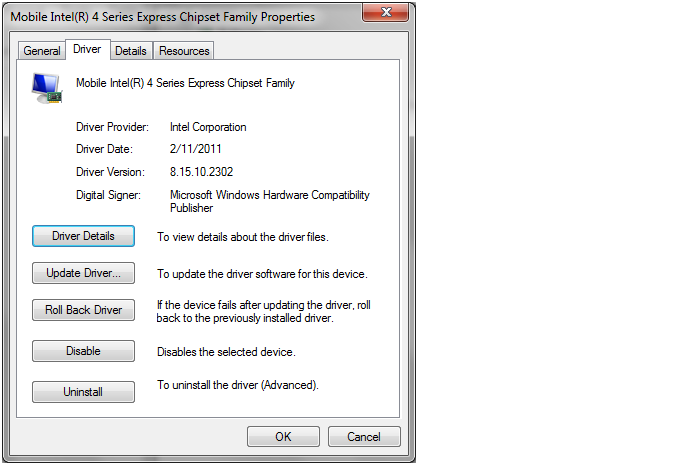
Now the Windows will remove the current problematic driver and will reinstall the previous driver. We will now get a notification saying that the settings of the system have been changed, and we should restart the computer. We should re-boot the system and have the previous driver installed. |
|
Home|
Technology|
IT Computer|
Exam|
Banking|
Finance|
General|
Other|||Copyright © Seekzed.com -2015.||||All Rights Reserved. ||
Design and Developed By RaynaSys Technologies. |
|---|